Ms Grunt's Class Resources
Penn Wood High School
Catch-up work for Introduction to Drawing
To catch you up on what we've been doing in class, please work on the following (some of which you may have already done):
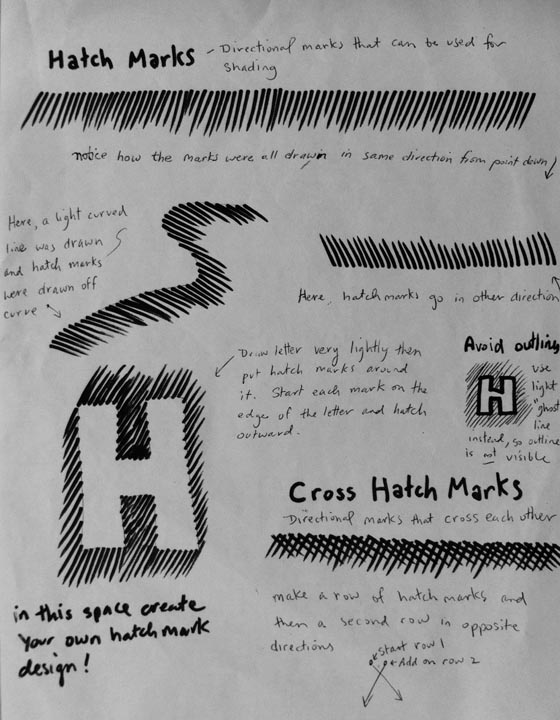
1. Hatch mark notes:
If you haven't yet, please carefully try to re-draw the samples on the 'hatch mark' sheet in your journal or on plain white paper. Remember to use very light 'ghost lines' as your guide.
Click here to see "Hatch Mark" notes
2. 4-box value scale:
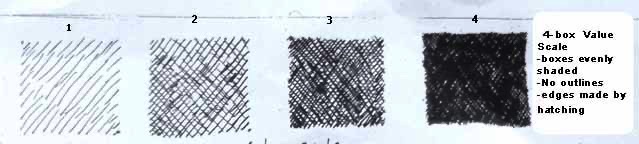
Look at the value scale strip provide (image 1). Use ghost lines to draw 4 boxes similar in size. Next, use a pen and try to hatch each box to match values 1 – 4. Note: most students have to do this several times before the values match.
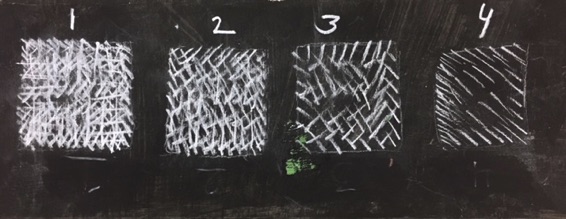
3. Use white charcoal pencil, (provided) and try a 4 – box value scale on black paper (image 2). Again, you may need to do this several times before you create a value scale that convincingly shows 4 different values (how light or dark something appears). Both value scales should avoid outlines.
4. Select a simple box- shaped object from home; often packaging from food works well (cereal boxes, box of pasta, box of raisins, etc). Try to draw this with ghost lines and pen to the best of your ability. Don't worry if it looks perfect. I am looking for your practice drawings. Next, if possible, position the object under a lamp, or shine a flash light near the object so that you can see its cast shadow. Study the object and look at your value scales. Try to draw the object and shadow as a practice drawing in your journal. Determine what value each side of the cube should be. You'll see how I include value-scale numbers in the sample below (image 3).
5. Finally, using the provided black paper, try to again draw the box-shaped object and include it's shadow (image 3).
Here, note that because the value scale is now being drawn on black paper, the amount of hatching for each value reverses. Whereas in the above value scale it requires minmal hatching to craete a very light value, on dark paper it requires a lot of hatching to acheive the same amount of 'lightness'. This often confuses students but once you practice a few times it should make sense.
IMAGE 1
IMAGE 2

Here note how the values are numbered; it may help to number your box prior to shading it so you can match your work to the value scale you have made.
Also, don' t forget to include the light hitting the table top (in this case a value between 2 - 3. By doing this you will create the cast shadow since it is just the black paper.
IMAGE 3